Category: Ubiquiti

  • Meshing with Unifi networks

    When setting up a Unifi network, especially if it’s at home or somewhere that’s not commercially wired, it’s pretty common to run into a room where you just can’t get a good signal from the nearest wired Unifi AP. The logical next step it to put a new Unifi AP in between this room and the nearest wired Unifi AP, and configure it as a “Child” in a mesh network, also know as a repeater.

    Now, while that often magically works the first time you do it, you may be tempted to start dropping in meshed APs all over, but that would be a big mistake. To understand why, you need to back up a little and understand how UniFi’s Mesh technology works, which is similar to other manufacturers.

    Let’s use the simple example above: a wired AP and a mesh AP, connected to the wired AP via WiFi itself. While this works well, you will notice that connecting to the mesh AP gives slower throughput because your network packets are handed off through the wired AP, and the negotiation overhead translates to roughly 50-75% slower throughput. Also, each time you connect a meshed AP to a wired AP, the wired AP needs to stop and send data to the meshed AP. While this is fast, if more than one meshed AP is connected to the same wired AP, it will slow down everyone’s throughput to the wired AP.

    Think of of this way: a mesh AP with a single radio doing both jobs has to receive each packet from its parent over the air, then retransmit it to you over the air — same radio, same channel. Every bit crosses the airwaves twice, so the radio’s airtime is split between backhaul and serving you.

    Now a smart engineer would design around this with multiple radios, but that would also need some serious CPU power to handle this. Luckily, these units are on the market, although they’re not expensive.

    If you can’t get one of these new multi-radio APs, you should consider UniFi’s “AC-LR” AP. The “LR” stands for long range, and through some beam-forming tricks, they focus the same radio signal into a cone shape to achieve a stronger signal over a longer range. Think of it like yelling through a megaphone; same yell, but it sounds louder. While the spec says 600 feet outdoors, my experience has been closer to 300 feet outdoors, and 150 feet indoors. Now think about 150 feet inside a residential house – that’s a long way. I recently put an AC-LR in a loft in my house that had no other way of connecting an AP. While the throughput was only about 30-60Mb/s when connecting to this AC-LR in mesh mode, that’s plenty fast for a video call.

    In summary, don’t put any more than a single meshed AP attached to each wired AP, and try to use a new model with multiple radios. If you can’t find one of those, then look into an AC-LR.

  • Getting your Unifi Router Failover working

    One of my Unifi Gateways, a USG-Pro-4, is located in a house where the internet can go out in a storm. Since the internet is provided by Comcast, and it’s just “household grade”, there’s not much I can complain about. But we’ve all experienced an outage just when you need it the most.

    My traditional way of dealing with this is yelling around the house, “Internet is out – everyone go on your hot spots”. Typically it’s back online in an hour or so, and then I have to make sure everyone has switched back over to the house WiFi. What I’d really love is to get the failover port working on my gateway, but that seemed to be expensive and difficult to set up until now.

    What I’ve rigged up will cost you about $50 in parts and takes about 30 minutes to set up. Once it’s set up, the gateway will failover if the main connection fails, and it will failback (the opposite of failover) when your main connection is back online. In my setup with the connector linked to my iPhone, this failover only works if I’m in the house and my phone is fairly near this connector, but that’s about the only downside.

    I’ve accomplished this by buying a BrosTrend AC1200 WiFi to Ethernet Adapter  (about $50) connector, which consumes a WiFi signal, probably from your phone via your hot-spot, and turns it into a cabled ethernet connection. With the cabled ethernet plugged into the WAN2 port on your Unifi, and a simple configuration,  the Unifi gateway now sees the WAN2 port as having a connection to the internet if the WAN1 connection goes down.

    Basic Steps

    1. Configure your connector BrosTrend AC1200 to connect to your cell phone’s hotspot.
    2. With an ethernet cable, connect your connector to the WAN2 port of your Unifi Router.
    3. Configure the WAN2 port as a failover for the WAN1 port.
    4. With everything cabled and configured, simulate the failover by unplugging your main internet connection from the Unifi gateway.
    5. Wait about 30-60 seconds for it to failover to WAN2, and you can test your internet connection as you normally would.
    6. When you’re satisfied it’s working, plug back in the main internet connection to your Unifu gateway and watch ut failback.


    To configure the BrosTrend, just follow the instructions in the box. It’s pretty easy and consists of plugging in the unit, waiting for it to boot in a few seconds, switching your WiFi on your laptop to use the SSID that the BrosTrend just created, and following a few prompts to connect it to your phone’s hotspot. When it’s working, you’ll see a blue “Signal” LED on the BrosTrend remain solid, indicating a good signal to your cellphone.

    Then you can use any ethernet cable, including the one it comes with, to connect the BrosTrend to your Unifi Router’s WAN2 port. Remember, the BrosTrend will need power as well, but I’m assuming you have that close to your Unifi Router.

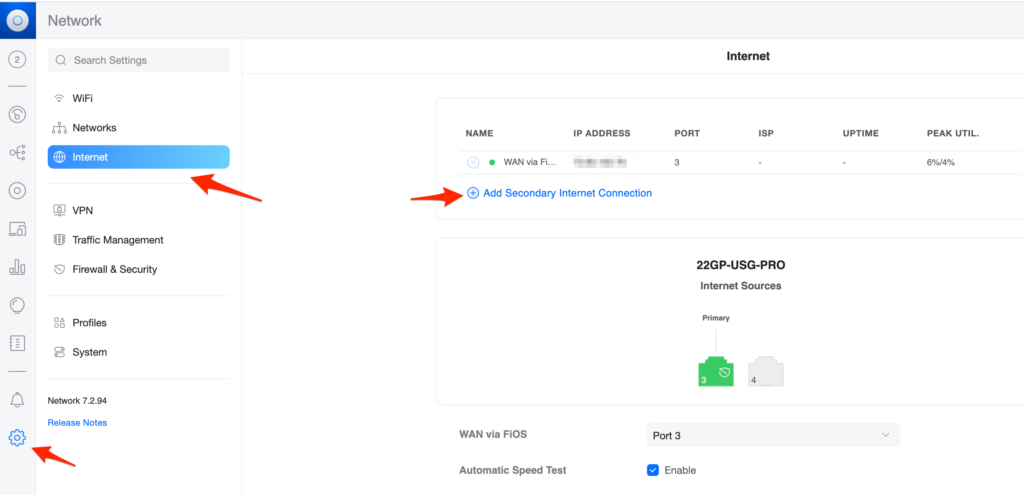
    Configuring your WAN2 port as a failover is so easy in the Unifi Controller console; you can miss it if you’re not watching for it. Go into your Console, click on the gear icon in the lower left, and then on “Internet: above. Then choose “Add Secondary Internet Connection”.


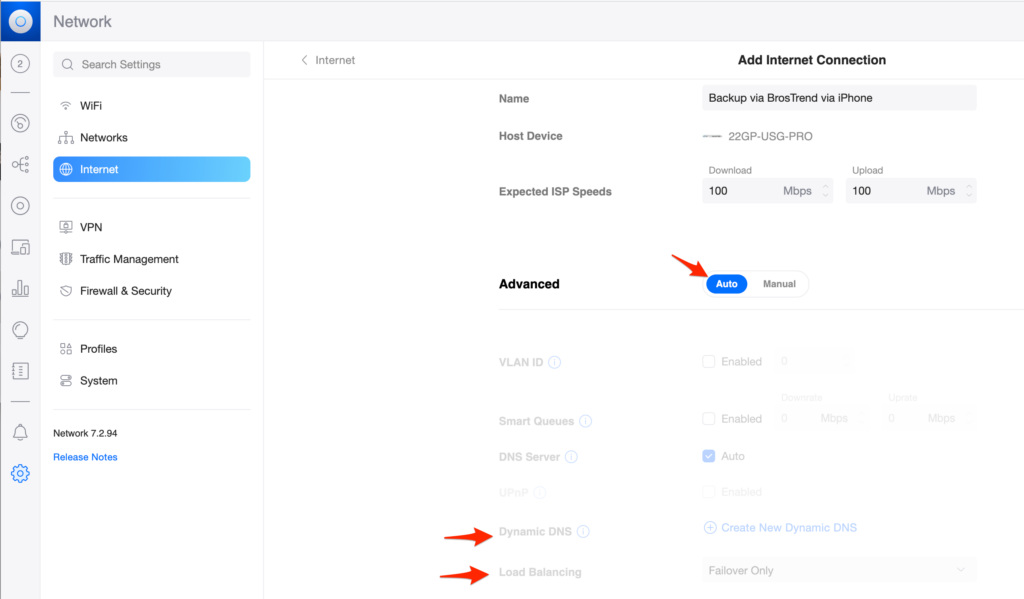
    Once you get the screen to add in a secondary connection, fill it in with a name that makes sense to you, fill in your guess at connection speeds, and choose “Auto” for the rest of the settings. If you’re using a Dynamic DNS, you can switch to manual and configure it, but in either “Auto” or “Manual” mode, it’s important that the “Load Balancing” be set to “Failover Only”. This needs to be done as there are only two modes, and the other, called “Balanced” will use your main ‘net connection half of the time and your iPhone for the other half. While that may be fun to experiment with, you’re going to max out your hotspot for no good reason. Setting it to “Failover Only” is the setting we want, which means it will only use this setting configuration if the main ‘net connection fails.


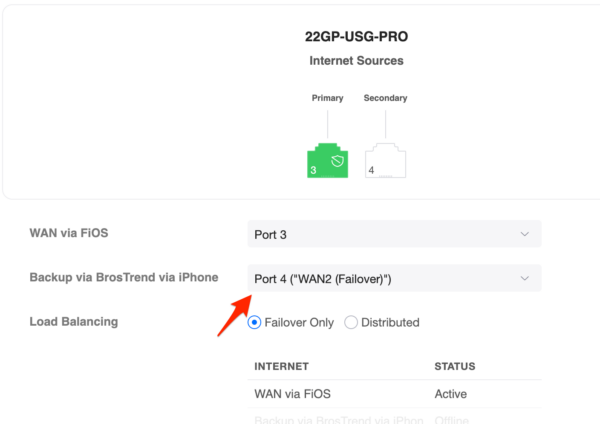
    Once you have this configuration saved, on the next screen, you will need to specify the port for this new BosTrend device to use. Port #4 is common as it’s the “WAN2” port on USG-Pro-4 routers. And again, make sure “Load Balancing” is set to “Failover Only”.


    After that, you’re all set. You should be able to simulate a failure with your main ‘net connection, and in a few seconds, the BosTrend should take over, using your phone’s hotspot for your entire network. Just reconnect your main ‘net connection, and the fallback should happen.

    If you get an error saying it can’t save your WAN2 settings, check the settings on your UGS-Pro-4 to make sure that Port #4 is enabled. If it’s disabled, it can’t be assigned to anything.

    Now you have a failover for your Unifi Router for about $50 and 30 minutes of your time. I hope you never have to use it, but you’ll thank me if you do.


  • Unifi Console sees existing Devices as offline

    With seemingly no changes, my network had a bad start to the day.

    Devices just started dropping off the Console, but the network was fully functioning. While not an emergency, as there wasn’t a network outage, I was “blind” as the Console wasn’t showing Devices, except for the USG4Pro itself and a few Clients.

    I waited for a good time (is there ever a good time), and I rebooted my USG4Pro, but this only had the situation worse as now nothing was showing up in the Console, and the connection to the ‘net stopped. Now this was an emergency.

    I then SSHed into my USG4Pro and, with the “info” command, found that it’s the connection to the Controller, which lives on the ‘net, was using a DNS address (I did this a few years ago). Using the “set-inform” command, I set it to an IP address, so it didn’t have to do the DNS lookup. Perhaps our DNS was down? Unlikely, but it was worth simplifying the network. Without a connection from the USG4Pro into my Controller, this could cause the issue.

    Unable to resolve the DNS address, so I set it to the Console’s IP address.


    With the IP address in place, I was getting an “Unknown[11]” error.
    With the new error of “Unknown[11]”, I was getting worried. When a vendor reports “unknown” in anything, it’s never a good sign.

    Since the IP address change didn’t seem to help, I powered-cycled the USG4Pro, hoping a full power cycle would pick up the changes as opposed to a soft reboot. That brought the USG4Pro back online as well as ‘net connectivity, but not the other devices (switches and APs). I then power cycled each of the other Devices, and they started showing up on the Console. Within a few minutes, the Devices started showing up in the Console.

    I have no idea what caused the initial problem or if the DNS-to-IP change solved it, but the emergency was over quickly.

  • How to monitor Unifi equipment

    There’s been a lot of talk on the ‘net about monitoring Unifi equipment. Unifi is a brand of prosumer networking equipment from a company called Ubiquiti. If you’ve ever wanted “the good stuff” for your home or office network, make sure to have a look at them, but I digress.

    One of the drawbacks of Unifi equipment is that they don’t publish their SNMP MIBs, so if you’re trying to add a Unifi router, switch, access point, etc. into your monitoring system, you’re in for a lot of work as you poke about with “snmpwalk” and see what you find. But, if you run Zabbix as your monitoring system, you’re in luck. Zabbix makes this easy, as they do with many things.

    Let’s take the example of a Unifi switch, but this concept works for all of their networking devices I’ve tested.

    The trick in all of this is the Zabbix Template which does not come pre-installed. To install it you can download it here (for credit, visit the author’s GitHub repository) and unzip it. You’ll find an xml file in the zip, and you’ll want to import it into your Templates. To do this, go into your Templates under the Configuration menu, click on the Import button and follow the directions.


    Once you’ve imported the Template, it will be available to add to a Host in Zabbix.

    Finally, to monitor the switch, create a Host which looks something like this in the image below. Note I’ve added the “UbiquityAirOS SNMP” Template. I’ve also added an Interface that points to the switch’s network address as SNMP. Since a Zabbix Agent can’t run on a switch, I’ve just used the network address as an SNMP device, so it doesn’t show any errors when looking for a missing Agent. Indeed, Unifi switches are SNMP enabled, so talking on that port won’t produce an error.

    Once you’ve created the Host, assigned the correct networking address as SNMP, and added the Template, just wait for the Template to do its magic. Be patient, as it may take a few minutes to sniff out the switch and its settings. When it does, you’ll see lots of Items created and Triggers to go with those Items, meaning you should have to do very little from here on out.

    Once the Items start to appear, you can look in the Latest Data menu item under Monitoring and select your switch’s Host. You’ll see lots of data appear that looks a little like the image below. Of course, depending on the model of your switch, different things will be monitored and thus shown in your Zabbix as Latest Data.

    Now that it’s up and running a few things to note.

    1. You may get notices of links (often called a “port”) in the switch going offline sometimes. These are not active ports, but perhaps a port that’s not currently in use, and Zabbix discovered this and alerted you. The first time this is a little alarming, but you soon realize that these ports are not in use, and you can disable them if you’d like.
    2. If you upgrade the Unifi device and use the same network address, you’ll get a whole new set of data in Zabbix that will mix with the old data. This mixing is probably confusing, so I’d recommend clicking on the “Unlink and Clear” link near the Template, and then adding the Template back into Zabbix. This will clear out the old data and only have the new data showing up.